The 5 Peaks to Summit Around Whistler

To say that the Whistler region is a hikers paradise is an understatement. Whistler and hiking go together like bears and the forests, or salmon and streams.
Hosting a landscape peppered with glacier-fed lakes, lush west coast rainforest, and snow-capped mountains, it’s no wonder that hikers travel from all over the world to mount British Columbia’s coastal mountains.
But with so many epic hikes to choose from in the Whistler region alone, how do you know where to start?
Not From Around Here? Ask the Experts!
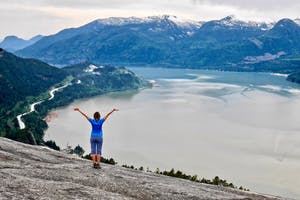
Hike the Chief for one of the easiest peaks around whistler.
If you’re not a local and are interested in an experienced hiking guide (or maybe even some extra company) to join you on your trek, then Whistler has a number of guided hikes that you can take advantage of. The benefit of hiking with an expert (and a local) is that you get inside access about when and where to go, and they might even show you a few secret spots along the way.
Here’s our rundown of five Whistler hiking trails around the Whistler region, in no particular order, because in our opinion, they’re all worth the climb.
1. The Stawamus Chief
- Experience level: Intermediate
- Duration: First Peak (2-3 hours) Second Peak (4-5 hours ) Third Peak (5-6 hours
- Elevation: 500 m (First Peak) 590 m (Second Peak) 630 m (Third Peak)
- Length/total round trip: First Peak (4km) Second Peak (5km ) Third Peak (7km)
- Best time to hike: April to November
*Note: The Stawamus Chief provides the ideal nesting habitat for the Peregrine Falcon. Please respect the wildlife and keep your distance. Keep an eye out for posted closures of climbing routes on the Chief during the Peregrine Falcon’s nesting season which generally occurs between mid-March to the end of July.
How to Get There
Driving from Vancouver, on the beautiful sea-to-sky (Highway 99), the Chief is located just south of the town of Squamish. There are two main parking lots where you can leave your car for easy access the trailhead.
Turn off Highway 99 at either Shannon Falls or Stawamus Chief Provincial Park. The trail starts near the park’s campground and via the access from Shannon Falls and the Sea to Sky Gondola. The hiking trails are well marked and the turn-offs for each of the three peaks are posted on signposts along the way.
What to expect
If you’ve ever driven through the sea-to-sky corridor, then you’re already quite familiar with that giant cliff face that stands proudly over the town of Squamish, BC. If you’re not acquainted with this mighty mountain, then let us introduce you. Meet ‘The Chief’, officially known as Stawamus Chief Mountain. This granite monolith and has been referred to as ‘Siyam Smanit’ to the Squamish Nation for thousands of years.
If you’re an avid climber, you may want to scale its sheer cliff face with your bare hands, and if you’re a base jumper, you’ll probably be happier leaping from it’s soaring heights. But, if you’re like most of us, you’ll be quite content joining the hiking trail that takes you around the side of the mountain, climbing steep sets of stairs, ascending ladders, navigating around boulders, and scaling granite rock up to its three magnificent peaks.
Yes, that’s right, we said three peaks. One of the best things about hiking the Chief is that you get to choose your own adventure. All of the trails are an intermediate difficulty and the lengths of the hiking trails vary starting at 4 km to the first peak, 5km to the second and 7 km to the third peak (all roundtrip). The hikes to all three peaks start at the same trailhead which begins by crossing over Olesen Creek.
Once you start your climb, the Chief doesn’t mess around. The first part of your trek will commence with an ascent up hundreds of stairs so you’ll feel the burn within the first five minutes. Your heart will be pumping for the first 30-40 minutes of the intense ascent. Once you reach the first junction near the top of Upper Shannon Falls and Sea to Summit Trail, stay left. Keep a close watch on the signposts which will direct you towards the peak of your choice
If you choose the first peak, you’ll be soon greeted with a combination of chains and ladders as you grab on and hoist yourself up towards some of the more technical (but fun) parts of the hike which lead to the first peak at 500 meters of elevation.
Whether you decide to stop at the first peak or follow the signposts to the second and/or third, all three summits offer you offer spectacular views of the blue-green waters of the Howe Sound, the town of Squamish and surrounding mountains including Mount Garibaldi.
Insider tip: The Chief hike is a classic and a favourite of locals and visitors alike. It’s one of the busiest, most popular trails in Canada, so be prepared for crowds on busy periods especially on the weekends and during the summer months. So if possible, pick a weekday – you might even get parts of the trail all to yourself!
2. Wedgemount Lake
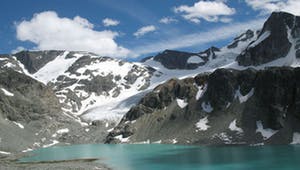
Snow capped peaks, and green alpine lakes are what awaits at wedgemount lake
- Experience level: Difficult
- Duration: 4-6 hours
- Length/total round trip: 7 km
- Elevation: 1,200 m
- Best time of the year to hike: July-September.
How to get there
Drive north along Highway 99 past Whistler. Keep an eye to your right for a sign marked Wedgemount Lake. Once you take the right turn, you’ll follow a dirt road for about three kilometres to a parking area. From there, you’ll find a trailhead is marked Wedgemount Lake.
What to expect
If you’re looking for a bit of a challenge but with rewarding views straight out of a National Geographic Magazine – then Wedgemount Lake hike is for you.
Located just past Whistler in the heart of Garibaldi Provincial Park, this steep hiking trail leads you through stunning scenery and natural wonders that will leave you in awe as you hike towards the heavens.
Navigating the route to the finish is a piece of cake as the trail is well marked and there is one route up and back. The elevation gain, the rocky terrain, and the sharp climb, however, is what makes this hike a challenge. But if you don’t mind the cardio, then the trek through old growth forests with stunning views at the summit make the strenuous climb well worth it!
Once you reach the top of the trail, you’ll be greeted with an absolute stunner of a view — Wedgewood Lake itself. Sitting at the base of a glacier, this lake is one of the most pristine, turquoise-green lakes you’ll ever see. Its beauty is further complemented by rugged peaks and untouched rocky landscapes that surround the lake.
Insider tip: This hike is a full day round trip so if you intend to complete it in a day, it’s a good idea to get an early start. The campground near the lake offers the perfect b
ase to set out and explore and the natural wonders at the top (check out these other campgrounds in the backcountry). You can wander through ice caves, around waterfalls, and maybe you might even go for an icy swim in Wedgemount itself (if you’re brave enough!).
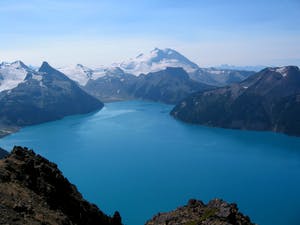
3. Garibaldi Lake
The view makes everything worthwhile – Panorama Ridge
- Experience level: Intermediate
- Duration: 5-7h
- Length/total round trip: 18.8km
- Elevation: 1,073m (at its highest point)
- Best time of the year to hike: April until November
How to Get There
From Vancouver, drive north on Highway 99 towards the direction of Whistler. Continue north on the sea-to-sky highway, about 35 kilometres past the town of Squamish. Keep your eyes on the right side of the highway and watch for a sign marked Garibaldi Provincial Park. Shortly past the Rubble Creek Bridge take a right off the highway onto a small paved road – it’s fairly easy to spot. Continue on for a few kilometres until you reach the Rubble Creek parking lot where you can access the clearly marked trailhead.
What to expect
The Garibaldi Lake is the quintessential British Columbia hiking experience. Simply search the hashtag on Instagram and you’ll come across thousands (over 33 thousand to be exact) of photos of Garibaldi Lake’s emerald waters, with reflections of snow-capped peaks, and landscapes so devastatingly beautiful that it will bring tears to your eyes.
Scrolling your way through photos of Garibaldi Lake on social media is one thing, but there’s nothing quite like taking in nature’s surroundings with your own eyes (Or capturing that photo for your own account, check out these other locations too!). And that’s exactly why this hike is a must-do on your Whistler hiking hit-list.
The first 7 km of the hiking trail takes you on a climb through lush forests as you walk amongst Western Red Cedars and Douglas Fir trees. The trail is well marked with kilometre markers along the way. Just beyond the 6 km marker, there is a major junction at about at 1,360 meters in elevation with options to go left at Taylor Meadows campground or right towards Garibaldi Lake. Here you can continue right, or take a left at Taylor Meadows, which had a little extra distance to your route.
Whatever path you choose, the trails will lead you you need to go. Once you officially reach Garibaldi Lake, you’ll see that the setting is the thing that dreams are made. Your sometimes gruelling hike up the mountain means that you’ll appreciate every second of that view, the glacier-carved mountains, the teal waters, and that glass reflection mirroring all the splendour right back at you.
Insider tip: You can do the Garibaldi Lake hike in a day, by why rush time in nature when you can stay the night? This peak of the trail has 50 campsites around the lake itself which are only available by reservation through the Discover Camping website. But make sure to book early, especially during the summer months when this popular trail gets especially busy (thanks Instagram!). So head out early – because parking is limited.
-
Black Tusk Mountain

A sneak peak of the Black Tusk peak around Whistler
- Experience level: Difficult
- Duration: 11 hours
- Length/total round trip: 29 km from Rubble Creek Parking lot
- Best time of the year to hike: July – October
- Elevation again: 1740 meters
How to Get There
Same as the Garibaldi Lake hike, from Vancouver, drive north on Highway 99 towards the direction of Whistler. Continue north on the sea-to-sky highway, about 35kilometres past the town of Squamish. Keep your eyes on the right side of the highway and watch for a sign marked Garibaldi Provincial Park. Shortly past the Rubble Creek Bridge take a right off the highway onto a small paved road. Continue on for a few kilometres until you reach the Rubble Creek parking lot where you can access the clearly marked trailhead.
What to expect
Black Tusk is the grandfather of all of hiking adventures on our list of Whistler hiking trails. And although it’s the most challenging of all of the hikes we’ve mentioned so far, it’s well worth the trip, for two main reasons.
Firstly, one of the most enjoyable things about taking on a more difficult hike is the potential for solitude. Since the average person will generally not take on a more strenuous and lengthy hike, it means you’ll have less people on the trails, and more of a chance to have the whole traverse to yourself (a true hiker’s dream).
The second most important reason why this hike is worth it? Simply put — the jaw-dropping views at the top. But before we boast about the scenery, let’s tell you how to get to Black Tusk’s peak.
Getting to Black Tusk starts the same way as the Garibaldi Lake hike, and since you already know what the Garibaldi hike is all about, let’s assume you’ve done the trek, you’ve spent the night at the campground and you’re reading to take on the Black Tusk hike in the morning.
When leaving Taylor Meadows campsite (after a good night’s sleep in your tent), you will cross Taylor Creek and continue straight along the Taylor Meadows Trail until you come across a major junction called Outhouse Junction. The junctions on the trail are clearly marked and will guide you towards your destination of choice either Black Tusk, Garibaldi Lake or Panorama Ridge (another must-do hike, for another time)
Once you reach the signpost for Black Tusk, the intense trek takes off with a vengeance (your heart rate included). As you ascend the mountain face, you’ll feast your eyes one of a kind views of Mount Garibaldi, and Garibaldi Lake in the distance.
You’ll soon come to a viewpoint called “End of maintained trail” and believe it or not, the uphill battle continues from there with even more vigor as you climb up vertical slopes of loose rocks and boulders – the remnants of Black Tusk volcano that was once active tens of thousands of years ago.
The hike isn’t complete until you give it one last push up towards of Black Tusk Peak. One you’re at the top, gulp down a giant drink of water and lake in the spectacular views at over 1740 meters in elevation.
To return to the Rubble Creek parking lot from Black Tusk, simply retrace your steps back down the hiking trail. Make sure to leave plenty of time to return to the parking lot during daylight hours.
-
High Note Trail
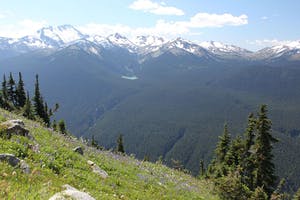
Alpine flowers and memorable views on the High Note Trail.
- Experience level: Intermediate
- Duration: 4 hours
- Length/total round trip: 9.4km
- Elevation: 420m elevation gain
- Best time of the year to hike: June – September
How to Get There
If leaving from Vancouver, head north on Highway 99 until you get to the turnoff to Whistler Village. To get access to this hiking trail catch a ride up the Whistler Gondola and the Peak Express Chairlift to the trailhead at the top of Whistler Mountain.
What to expect
To wrap things up on a high note (pun intended), your Whistler hiking experience isn’t complete without a trek up High Note Trail. This trail has the best of both worlds. You get the enjoyment of a hike, but you also get to sit back and savour the views of Whistler Mountain and surrounds as you ascend the gondola and chairlift to the trailhead at the top.
Once you reach the top of the Peak Express Chairlift make your way to the giant Inukshuk, Whistler’s iconic landmark. Once you reach the trailhead, you’ll descend through rugged landscapes into an undulating hiking route. As the trail hugs the mountainside you’ll catch views of several key landmarks of the Whistler region as you hike along including Cheakamus River, Cheakamus Lake, Black Tusk, and other surrounding mountains that line the valley.
Although it’s not a super challenging hike, it will get your heart pumping and lungs working hard as you breathe in the fresh mountain air. There are also areas of the trail where you’ll climb over and around rugged terrain, boulders, and loose gravel, so watch your footing and make sure to wear sturdy hiking shoes.
Continue to follow the signposts along the way as you near the end of your hike where you’ll loop back to the Roundhouse Lodge and head north at the trail junction away from Flute Summit and Singing Pass. Continue along the High Note Trail back towards the Gondola – for a well-earned descent down.
Insider Tip: There are height restrictions for the Whistler chairlift and children under the required height are not be permitted to ride on the chairlift due to safety reasons. Check with Whistler / Blackcomb’s website for the updated requirements and make sure you check the lift times as they vary during different times of the year.
Hiking Near Whistler BC: What to Know Before You Go

Its often refreshingly cool in the trees, bring layers!
Even if you’re an experienced hiker or if you consider yourself healthy and fit, there are still a handful of things to keep in mind before you head off on a hike to ensure your best experience possible. First of all, know your physical limits and be kind to yourself. If you have any severe health conditions or if you’re feeling under the weather, listen to your body and choose a more leisurely hike or walk over a more difficult hike.
It’s always a good idea to ensure that you check the most recent weather and hiking conditions and ensure you know how to get in touch with emergency services just in case you run into trouble. When embarking on a longer hike, let a close family member or friend (that’s not with you) know where you’re going and when you plan on returning. And finally, make sure that you wear the correct hiking gear and bring the required essentials with you. When hiking to higher elevations the weather can change at a moments notice, so ensure you dress in layers and bring warm clothing and a rain jacket, especially during the spring and fall hiking season.
If you’re doing an overnight hike you’ll need more equipment, but here’s a checklist for what to bring with you on a day hike:
- Plenty of water
- Healthy snacks/food to fuel you on your journey
- First aid kit
- Bear bell (just in case)
- Fire starters/matches
- Sturdy footwear
- Headlamp
- Hat and/or sunglasses
- Insect repellent
- BC Park Pass (if required)
- Rain jacket and layered clothing
When it comes to Whistler hiking trails, these five peaks only scratched the surface! From the sheer cliffs of the Stawamus Chief, to the teal waters of Garibaldi Lake and beyond, the opportunities for hiking in Whistler are endless.
Happy hiking!