Heading into the Whistler Backcountry | World Class Adventure

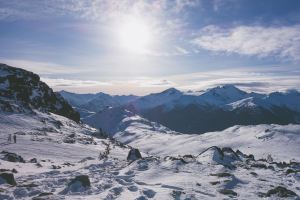
Whistler is (rightfully) renowned as a world-class ski resort. But did you know that it also offers some of the best backcountry skiing in BC (or possibly the world)! And if you’re looking for fresh powder, exciting lines, and an escape from the crowds, getting out in the Whistler backcountry could be the way to go. You could, frankly, fill a lifetime exploring the Whistler backcountry. But if you don’t have time for that, you can still fit some world-class adventures into your time here.
There’s a lot of things to consider when you’re planning a trip to the Whistler backcountry. We’ll explain some of the key things to plan ahead later in this article. If you’re new to backcountry skiing, check out our introductory guides to backcountry skiing and snowboarding in Whistler too. Oh, and you can always book a guide to help make your day as epic as possible!
And now for the fun bit. We’ve chosen some of our favourite backcountry runs for intermediate and advanced skiers in Whistler. We’ve stuck with routes you can access from the resort, but there’s plenty more in the surrounding area if you’re looking to go further afield. All of these routes are worth writing home about, so whichever you choose, you won’t be disappointed.
Best Options for an Intermediate Backcountry Adventure
If it’s your first-time backcountry skiing in BC, we’d recommend trying one (or more) of these classic lines. We’ve stuck with routes you can access from the resort, but there’s plenty more in the surrounding area if you’re looking to go further afield.
- Cowboy Ridge
If you want to get past the crowds, but still get back in time for apres, Cowboy Ridge is a great choice. The second ridge past Oboe Summit on the Musical Bumps, Cowboy Ridge gets significantly less traffic than the first routes. That means lots of fresh, fluffy powder even days after a storm.
Head up to Flute Summit, then ski and skin up Oboe and ski the Apostles before reaching Cowboy Ridge. There are lots of different lines to choose from here, including great tree skiing lower down. The skin tracks are relatively easy to navigate too, with the terrain rated as challenging, but not complex. You can then ski out to the village via Singing Pass, or skin back up Flute bowl to get back into the resort.
- Husume
For a short but memorable trip in the Blackcomb backcountry, we love Husume. This couloir offers a long descent up to 40° back to the Blackcomb Glacier (and the beautiful ice cave). It looks dramatic and intimidating, but in fact, the entrance isn’t too narrow. And the snow is often good as the couloir is well protected and north-west facing.
This is a popular and accessible route which you can easily fit into a sunny afternoon of ski touring. A word of warning though: while you may see people boot packing up here without avalanche gear, this is still the backcountry. Make sure to bring your beacon, probe, and shovel even if you’re only heading out for one lap.
- Corona Bowl
Another long and rewarding descent on Blackcomb, without too much hard work required to get there. Corona bowl is the next bowl over from Husume, offering a less intimidating but just as fun descent onto the Blackcomb Glacier. It’s a safe bet for good snow and there are lots of routes to choose from once you’re in the bowl.
You reach Husume via the Blackcomb backcountry gate. Traverse across, and then skin up the Blackcomb Glacier, before crossing over onto the ridge of the Spearhead Glacier. You can choose from a few short but fun descents here, before skinning up to the start of Corona Bowl. Once you’ve skied your chosen line, you’ll meet up with the Blackcomb Glacier road and eventually Crystal Chair.
Best Options for an Advanced Backcountry Adventure
For those with more experience, looking to go further afield, there are lots of truly epic lines in the Whistler backcountry. Be sure to leave enough time to return to the resort, and pack a headlamp!
- Fissile
Fissile is the iconic peak that rises from the valley between Whistler and Blackcomb mountains. It stands out from the surrounding peaks and practically begs to be skied. There are lots of great lines from the peak of Fissile, which offer consistent, steep descents, including several slightly nerve-racking chutes. Be careful, as some routes are only skiable when the snowpack is particularly good.
You reach Fissile via a long approach from the backcountry gate on Flute Summit on Whistler mountain. Traverse the Musical Bumps past Russet Lake, and then finish with a bootpack up the west ridge of Fissile. To return, you can take the Singing Pass trail all the way to Whistler village (fair warning, Singing Pass is no fun on a snowboard). The whole trip will take at least 6-8 hours.
- Decker Mountain
Heading over to the dark side (as Blackcomb is commonly known), Decker Mountain is a great choice for a full-day trip. There are several routes to choose from here, including Decker Glacier, the Main Chute, 9th Hole and the Fingers Chutes. They offer a variety of descents, from mellow ridges to scary couloirs – with the exposed Finger Chutes being the most hair-raising.
Decker is accessed by the backcountry gate on the Blackcomb Glacier (get there via the Showcase T-Bar). While many people head out of bounds this way, few make it all the way to Decker. This means you’re likely to find plenty of untracked lines, and could even have the mountain all to yourself! The round trip to Decker will take your 4-5 hours, and you can ski back into the resort via Seventh Heaven.
- Mount Pattison
If you’re looking to go even further afield, head past Decker to Mount Pattison. This is a full day adventure, so make sure you’re fit enough to keep up. You’ll skin and then ski several peaks before finally summiting Pattison after traversing the Decker Glacier and Trorey Glacier. The views out here are incredible, and you’ll be rewarded for your effort with untouched snow and unforgettable lines.
This is a trip to undertake in the best of conditions: make sure the snowpack and the weather are stable before heading out. Things can change quickly around here, and you’ll be a long way from help if something does go wrong. But for those looking for a once-in-a-lifetime experience backcountry skiing in BC, this could be it.
How to Plan for a Backcountry Adventure near Whistler
Now you’ve got some inspiration, it’s time to start planning your trip! There are lots of things to consider to create a successful trip to the Whistler backcountry. Here’s a few things you absolutely should consider before you head out. And of course, ask around the village before you head out. You might score some insider knowledge about conditions and runs not to miss!
Should You Hire a Guide?
With so much territory, it helps to have a local guide
Honestly, if it’s your first trip to Whistler, we’d strongly recommend hiring a guide. Regardless of your experience in the backcountry, there’s nothing like exploring new terrain with a true local. They’ll find hidden powder stashes, no matter how long it is since the last snow. And their hard-earned knowledge will mean you get the best lines, whatever the conditions.
The terrain around Whistler is boundless, and often complex. This is big mountain territory. If you’re looking to explore some of the more challenging lines (like Fissile or the Spearhead Traverse), you’ll want an experienced local in tow to help you read the conditions and the terrain. You can even book guided multi-day trips to really explore all that the Whistler backcountry has to offer.
The good news is, there are loads of expert locals who are willing to share their tips, tricks, and love for this place. Book a backcountry ski or snowboard tour in BC with Whistler Adventures, and you’ll be treated to a full day (or more) of world-class backcountry adventure. Plus, they’ll take away all the stress of planning your trip, giving you more time to focus on soaking in the astonishing scenery, and choosing the best lines.
Understanding Avalanche Conditions
Research snow and avalanche conditions before you head out
Even if you do hire a guide, it’s beneficial to have some understanding of the avalanche conditions. And if you don’t have a guide, it’s absolutely vital. Luckily, there’s plenty of great information available, including the Avalanche Bulletin for the Sea to Sky, and the Whistler Blackcomb Backcountry Advisory.
Avalanche Canada produce daily Avalanche bulletins throughout the winter season. They’re packed with easy to digest information about the snowpack, weather, and terrain. Before heading out into the Whistler backcountry, read through the bulletin in detail, and plan your trip accordingly. The bulletins are clearly broken down to explain the current concerns and overall risk of heading out into the Whistler backcountry.
A lot can change in a couple of days here, so it’s vital to be up to date. In fact, we’d recommend keeping an eye on the avalanche bulletin for a few days or even weeks before your trip. That will give you a much better idea of how the conditions have been changing, and therefore what will be safe, and fun, to ski. Understanding the conditions will dramatically increase your chance of coming home safely with an epic story to tell.
What About Avalanche Training Courses?
If understanding snowpack, weather, and terrain all sounds alien to you, consider taking an Avalanche Skills Training Course. Here in Whistler, pretty much everyone takes the course before heading out without a guide. And aside from providing you with heaps of useful information and practical training, the course is also tons of fun.
Generally, you’ll spend two days with a seasoned instructor and a group of like-minded, outdoorsy people who want to get out there and have fun. You’ll learn to understand how to make safe run choices by analyzing the slopes and weather conditions for low-risk options. You’ll find out more about how to understand the Avalanche Bulletin, and how the avalanche risk should change your plans. And crucially, you’ll get to practice for the worst case scenario: what to do if someone is buried in an avalanche.
Of course, the hope is that this will never happen to you! And once you’ve completed the course, you’ll be much better prepared to travel safely in the Whistler backcountry, and choose safe, fun lines whatever the weather. There are plenty of courses to choose from in Whistler. An AST1 course will give you the basic knowledge needed to head out and have some fun – we love this one from the Mountain Skills Academy, which cost $279 CAD for two days. For more experienced backcountry skiers who want to take their adventures to the next level, the AST2 course dives into much more details.
Must-have Backcountry Equipment
You’ve got the training, you’ve read the Avalanche Bulletin, and you’ve chosen your route. But of course, heading out in the backcountry isn’t quite the same as popping up the gondola for a couple of in-bounds runs. There’s extra equipment that’s vital to keep you, and your friends, safe while you’re out there. Everybody accessing the Whistler backcountry should carry:
- An avalanche beacon (with full battery)
- An avalanche probe
- A shovel
Heading out without this basic equipment is frowned upon in Whistler, and the locals may well call you out. So don’t be that guy! Remember, it’s not just yourself you’re endangering by heading out unprepared.
In addition to the minimum safety equipment, we’d also suggest bringing:
- Plenty of food and water
- A map – John Baldwin’s Backcountry Whistler is the best for the area
- First aid kit
- Headlamp (in case you’re out later than expected)
- Sunglasses
- Extra layers
- GPS and/or satellite phone
- Your friends (never, ever head out of bounds alone)
The Best Backcountry Skiing in BC? Come to Whistler
For backcountry enthusiasts, Whistler offers some of the best bang for your buck anywhere in BC (or maybe the world?!). All these unforgettable lines, heaps of fresh powder, and you can use the lifts to get halfway up there. It’s almost too good to be true. So what are you waiting for? Get the gear, do your AST training, and we’ll see you in Whistler next winter!